Thursday 18 May 2017

Extended Practice: Module Evaluation

Character animation is something I have always been interested in, so I really wanted to push myself with this module to animate the greatest character performance I could. I had also always wanted to create a film based around my family, so when the opportunity arose that I would be able to do just that, I was delighted. As the subject matter was something that meant a lot to me, this only drove how much effort I put into its production.

I was really pleased with how well pre-production had gone for me; I had carried out sufficient testing and background designing, that I knew exactly what I wanted the final product to look like. Research into other practitioners and how they had used watercolour was highly useful for me at that stage, as it made me think differently about my own work and technique, and how I could better it. For example, Peter Baynton’s Weather the Storm made me consider lighting and how the use of subtle shadows could greatly improve the aesthetic of the animation.
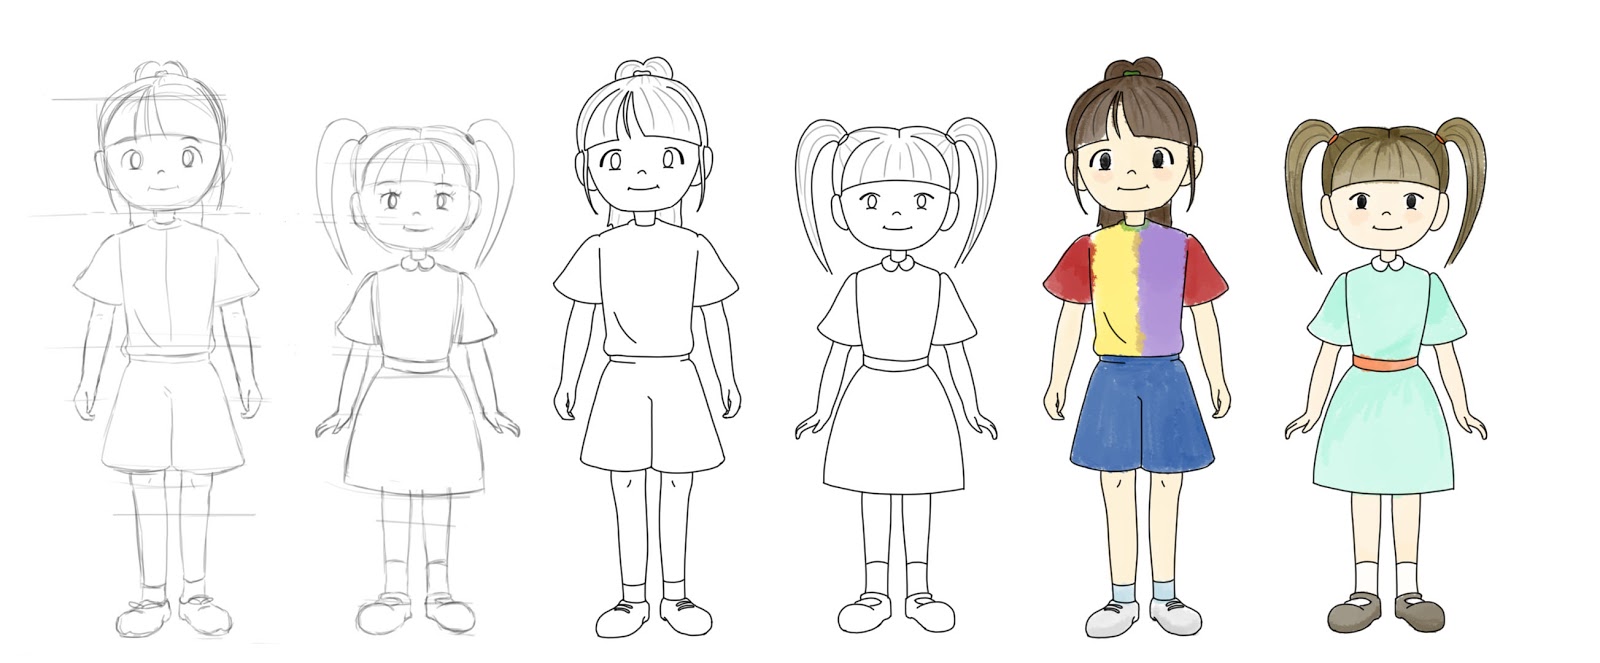
Asking Wing to produce my character designs was by far the smartest decision I’ve made, in my eyes. I very much dislike character designing, and rather than slave away for days on end trying to come up with designs that I would be happy with and that were suitable to animate, I collaborated instead. I saved a lot of time and effort by doing this, and Wing produced designs that I was ecstatic with. They were very cute looking which complimented the light-hearted nature of the film that I was trying to achieve.
The characters were very anime-esque, which provided me with a slight challenge as I had never animated in this style before. However, in the end this deemed not to be an issue, as I was still able to give the characters very naturalistic and true-to-life movements, and really push their performance which had been my aim from the beginning. I think I have managed to achieve this goal, as I find my characters to be very believable. I’ve really tried to focus on facial expressions and how the characters have reacted and interacted with one another and their surroundings. For instance, when the kite crashes down in front of the older sister, I made sure to give her enough time to react to the kite’s movements. This helped make my characters seem as though they were moving and acting with intent, which in turn helped bring them to life. This is something I wouldn’t have considered had it had not been for my dissertation, which has proved to be an enormous influence on this project. I have been able to put my research to practice, which has resulted in character performances that I am truly proud of.

I also collaborated with students from Leeds College of Music for this project, which again, was another smart decision on my behalf. I know next-to-nothing when it comes to music, and I wouldn’t even have known where to start in terms of a score for my film. Working with these students has been a pleasure; we’ve been organised from the very start, and we have consistently updated each other with progress. I was able to explain to them what it was I was looking for, and they were able to provide me with exactly that, and all in good time too. The music they provided me with enhances my film dramatically, as it has just the right “tone of voice” and isn’t too over the top. It also lines up perfectly with key elements in the story. Overall, they’ve all done a wonderful job and I couldn’t thank them enough.

In terms of planning and organisation, I don’t think I’ve done too badly. I had made up a timetable that outlined all my major deadlines and milestones I’d like to meet, and for a while I was ahead of schedule, having completed pre-production and my animatic a couple of weeks before my given deadline. Then unfortunately I was involved in a car accident that meant I was out of work for a couple of weeks, which lead me to fall behind. However, that isn’t to say that I am not at fault for not finishing my film in time for hand in. There was a brief period towards the end of the project where I was really starting to struggle with the work load, and generally feeling a lack of motivation. This also significantly slowed down production. To combat this, I had taken the initiative to review my animation - particularly the story - to see whether there were any changes I could make that would make finishing the film seem more achievable. I ended up cutting a few scenes which resulted in a much shorter and less ambitious story, and although I’ve not been successful at completing the film for hand-in, it’s much more likely that it is going to be finished in time for exhibition.
Working on this project has really opened my eyes to the importance of collaborating. Had I have been less precious over my film, and reached out to others to get help with the production (for example, have someone complete my backgrounds for me based on my designs, or have a student fill out my in-betweens), it’s highly possible that my film would already be completed by now. Looking back, it would have taken some of the stress off me and would have allowed me to focus on colouring and pushing final finishes (for example shading and shadows). On the other hand, I’m glad I carried the work out in the way I did, as I am now aware of my full potential as a practitioner and what I can produce on my own. It was my last chance to make something I was interested in and truly passionate about, and I wanted to make the most of it.


Overall, I’m extremely proud of myself. There are things I certainly could have done better (collaborate and be less precious about my work), and there is still work and improvements to be carried out on the film before it is finished, but I’ve improved so much and come a long way in such a short amount of time. I’m happy with myself that I’ve pushed myself to steer away from traditional animation and work digitally, as it has significantly improved my work flow. Not only that but I have developed my film – almost entirely on my own - from initial ideas and concepts through to completion, and that to me is truly amazing. 

Extended Practice: Festival Research

Manchester Animation Festival

Manchester Animation Festival is a festival I've always seen myself targeting with my film because I am obviously familiar with this event and it is local. I'd like to submit here, not just because of the convenience, but I think it also has great opportunities and is very suited to my film. Having been there myself before, I know it has a great focus on student films, and they accept a huge variety of styles and genre of films.


The deadline also seems very achievable for me. The website also outlines that you can in-fact submit work in progress, so long as it is completed by August. 


It's also nice to know that I've already produced (for the most part), everything the festival is looking for in terms of submission, and the film I submit doesn't have to be exclusive to this festival, which means I would still be able to submit to other festivals too.

Manchester is definitely a festival I would like to submit to, and I plan on doing just that.


Animex
There's not a lot of festivals that I am actually aware of, but Animex is one that I have heard about so wanted to look it up to see if it was suitable to submit here. The festival seems very student friendly having recently adding new categories such as "Best First Animation", and is open to all techniques and mediums. It has two student categories that I would be eligible to win, including 2D Animation Award and Character Animation Award.


It also has had an impressive judging panel in the past, which is a plus.

Unfortunetly the deadline for submissions for this year has already passed, but I could always look into submitting here for next year. The film requirements for this year stated that the film had to have been made after May 2015 allowing for it to have been completed for around a year and a half. This means I should have no problem waiting for next year's submission if I decide I'd like to submit here. I definitely want to push Kites' potential, so this may be likely. 


Leeds International Film Festival
LIFF is another festival that looks like it has wonderful opportunities. Not only is it incredibly local and convenient, it is a qualifying event for the BAFTAs. I couldn't even imagine being nominated for a BAFTA, but I definitely like the sound of it. As if that wasn't enough, the festival also offers cash prizes, which is always good in my eyes. 


Though at a glance it doesn't seem that the festival has a particular student focus/category, and that the competition for this festival is most likely to be huge, I see no reason why I shouldn't submit here. The film doesn't have to be exclusive, and the deadline for this festival is later than the others I have looked at, giving me more time to really nail the finishing touches to my animation. 

It looks like LIFF is a definite. 

Extended Practice: Progressing Towards Completion

18-05-17 Progress

The next steps I am going to take to get my film finished are:
- Finish of the remaining line work
- Colour remaining frames
- Add in backgrounds
- Add shading and final details.

The first three on my list are necessities, and these need to be completed in time for exhibition, where as the shadows and shading is just going to be a nice extra if I have the time. I'm definitely going to add these in my own time, and before I submit my film to festivals, as the addition of the shading really enhances the aesthetic of the film, by making it more visually interesting, but also by giving the characters and the scene more depth. 

Shading and Shadow Examples


Alternative Music Score

Apparently I'm also going to have to consider what music I am going to use for my final film too. Out of the blue - in the early hours of the morning of hand-in day - I was sent an audio file by another music student, who had scored against a slightly older version of my animation that I had posted online. The student really liked the work that I was doing and wanted to put forward the ideas he had for the music, just for fun. I really like it. It's bizarre to watch my film back with a different track, as I'm so used to seeing it with the music that my collaborators produced, but I like the different approach. It's very playful and fits the timings of the animation very well. 

I'm not sure which I prefer. It might be worth asking for a second opinion about this at a later date, as it could be something I implement for the final show. We'll see. 

Extended Practice: End Credits

To fully realise my intentions for my film, I thought my next logical step was to work on the end scene/end credits. I had put this scene off for so long, as it seemed like it was going to be the hardest to animate.

I was not wrong.

End Scene Progress

I decided that I would animate the first three to four seconds of this scene, as I wanted to experiment with the idea of them fading away as they're running into the distance, rather than animating the entire run/skip cycle that lasts about 10 seconds. I soon realised that animating the whole scene wouldn't be plausible anyway; the characters are already starting to lose quality as it is, and they've traveled less than half of this distance I originally intended. As much as I wanted to keep the 'loosing the shoe' element in the story, as it was a spontaneous moment that would add to the personality of the character, and got a chuckle out of my classmates during critiques, I don't think I'm going to be able to keep it. It's a lot more work for something that isn't entirely necessary, and by that point the lines will be too thick to include detail. 

I was hoping to have completed all of my line work for hand-in, but unfortunately I haven't been successful. Besides having to put some time aside for other modules and assets needed for submission (which I should have planned for in advance, in retrospect), this scene is taking a lot longer than I had originally anticipated. I have spent a good three days on it as it stands, and there's still around 15 in-betweens left to do in order to reach 3 seconds. With that being said, I'm happy with the progress I have made with it so far. It is looking like it may just turn into one of my strongest scenes too. 
I think the skipping and running is particularly well timed, and I've been able to differentiate between the personalities of the two characters by altering how they both run. The older sister's skip is very bouncy and fluid, whereas the younger sister is struggling to keep up and is having to half skip, half run. 
I found this scene particularly challenging as the two are holding hands. This meant that I couldn't really animate them separately as I usually would, but instead had to consider the timing and spacing of the characters together. On top of that, the perspective of the shot has been really difficult to work with, but I stuck at it rather than changing the angle of the shot (which I was tempted by, multiple times) as I don't think a different angle would have been as effective. I also would have had to rethink my end credits, so in the end I think it wouldn't have saved me that much time by the time I had worked out the logistics of the scene.


End Credits - Rough Plan

Here I have quickly experimented with the end credits, by using the assets I made to make my art board/Crew Biographies. The text is obviously not consistent, but this is something I will correct when I come to do the titles properly.
I think it's not far off from what I want it to look like, but at the moment the running sequence seems to end too abruptly. Whether this is because it is unfinished and that I've not been able to properly experiment with holding the frame or having them fade away yet, I'm unsure. My plan is to finish the animation first and revisit this idea, so I will have a better idea of whether or not this scene is going to work. If I discover that it doesn't work, I think my next option to explore would be to include another subtle camera pan, but this time have the camera going back up into the sky. I think this could be a nice touch, as it would end the way it started (much like how the characters haven't got anywhere with their kite flying), and this would offer me more space to place my credits. I was unsure where to place the text in this example; over the grass in the bottom right hand corner felt a little too out of place for me, and placing it over the trees on either side wasn't an option as the text didn't stand out enough. Though I'm not fully convinced tucked away at the top over the sky is the best solution either. Again, this is something I shall revisit, once the scene is animated. 

Extended Practice: Promo Pack

Film Synopsis

Kites is a heartwarming story about two sisters that are brought closer together, despite their failed attempts at taking to the skies with their new toy.


4 Stills


I decided to go for these particular stills for my promo pack, as I thought they showed a good range of shots and were good examples of shot framing. I also thought they were the most interesting, and for the majority, they gave insight into the relationship that the characters have, which is the main focus of the story.

I have worked into the stills slightly, by adding finishing touches such as shadows and shading. Though my film doesn't look like this at the moment, this is the standard which I am aiming for. Line work and colouring are the main priorities for exhibition, though I aim to have the shading completed by then too. Less ambitiously, the shading and shadows will be completed before I submit to festivals.


Trailer


Poster


Biography

Personal Bio

Collaborators Bios


Collaborators - Individual Bios

In order to make my crew biography, I created a boarder to make the information seem more interesting and professional than just black text on a white background. I designed the boarder with the idea of it being re-used as an art-board in mind, so that I can be consistent with the branding for my film. 

Thursday 11 May 2017

Extended Practice: Producing a Film Trailer

When it came to putting together a rough draft of what I wanted my trailer to look like, I completely stemmed away from my original idea. In the end I simply chose well animated scenes that would also flow together nicely, and tell a story in itself.

Trailer Draft

I broke up the scenes with snippets of my synopsis, to help explain the premise of the film. The text also helped with the continuity of the trailer, by breaking up scenes that didn't necessarily follow from one another. As I was happy with how the draft was looking, I got started on colouring the corresponding scenes. 

Kites Trailer

I feel like my project is finally coming together now. I know I have made good progress with this animation already, but seeing all the coloured scenes together like that feels amazing. It's made it feel like an actual, real film now, especially as I have plastered it all over my social media telling people to keep a look out for its release in June. 

Extended Practice: Creating a Poster

One of the items on my agenda was to create a poster for my film. Before I got started I quickly researched existing movie posters, both live action and animated films, though I already had an idea of what I wanted my poster to look like.

Poster Examples

The general template across the film posters that I found consisted of having a big defining image, and the title of the film in the blank spaces, usually tucked away at the edges; Exactly what I was planning to do!


 Poster Plan and Photo Reference

For the poster I very easily could have used a still from the animation, to save myself a bit of time, but there weren't very many character poses that I thought would be appropriate for the poster. In my head I saw the characters standing together holding the kite, almost as if they were posing for the poster. I also wanted to show that the two characters were close and simply having them stand side-by-side (which is what the outcome most likely would have been had I have used a still from the film) didn't really get this message across to the audience, so I went for drawing a new pose. I even fished out an old photograph of the two of us for reference and authenticity. 

Final Poster

I'm really happy with how my poster turned out and I think it accurately portrays the nature of my film. I'm glad I opted to re-drawing the characters as it's made more a more dynamic and interesting poster. It also didn't take me too long to make, as I was able to re-use the background design and text that I had made for the opening titles/trailer. 
(I did want to feature LCAs logo on there too, one that was coloured using the same brush as I used for the text, but I couldn't decide where I wanted to put it. It either felt out of place, or distracted too much from the characters, so in the end I scraped it. I will make sure to use it in my final film however). 

Extended Practice: Producing The Title Sequence

I was in the middle of planning out my trailer, when I realised I was still unsure of the font I was going to use for my titles. I figured the next logical step was for me to complete my opening title sequence, so I could decide on a brand that was going to be used across my promotion material.

To get started I had to make a new background that could be used for the pan that I had planned. I had drew out a 16x27 template for the background, and made sure to work on a large scale, so that it wouldn't lose quality when it was zoomed in on for the pan. Once this was complete I was able to experiment with text.

Large Background Design

A few months ago when I was testing After Effects components for my initial title sequence, I had briefly explored different fonts. My idea was that I wanted to find a font that looked handwritten, as the entirety of the film is - or at least looks - hand painted.

Experimenting With Fonts

I thought the idea was nice, but I don't think any of these fonts were quite right. In order to try and achieve the handwritten look that I was hoping for, I attempted writing out the title myself. Shocking.


Hand Written Title Testing

I started off using a variety of calligraphy pens in Photoshop. I was experimenting with Red as the kite in the film is also red, so thought this could be a nice touch. However, the red seemed to get lost within the background, so I opted for a white. This didn't stand out either (I don't know why I was surprised by this) so I gave the text a thin, black stroke/outline to try and combat this. The result was better, and I liked that it had a fine outline that was consistent with my background designs, but it just didn't work. I moved onto using dry media brushes, and I really liked that the textured feel was consistent with the rest of my work and so I stuck to experimenting with this.

Attempt One

Playing with the hand-written theme, I animated the text using the stroke effect in After Effects. I thought this worked well, and it was more interesting than just a simple fade in and out, but I felt there was something not quite working with the titles. I couldn't put my finger on what it was that I didn't like, so I tried changing the colour of the text again. 


Final Titles

That was the issue. The black seemed to be too harsh and stood out TOO much. The blue that I opted for is easy on the eyes, and works well against the blue of the sky.

I'm really happy with my opening scene. I like the timings of the animated text against the timings of the music, which I think is complimented by the subtle pan of the camera. I think this is also a nice introduction to the characters and the scene, as the movement isn't harsh or too fast. 

Friday 5 May 2017

Extended Practice: Planning Out a Film Trailer

After researching animation trailers, I've found that I should give insight into the nature of the film without giving too much away, though there aren't really many twists that I could give away. The only real plot twist is that the kite gets stuck in the tree, rather than having a successful attempt. This gave me the idea to make the trailer SEEM as though they have been successful, by simply avoiding the crashing of the kite, which will only emphasize the shock of the failed flying attempts.

Then I thought, depending on how this was put together, it might seem too mundane/uninteresting. To combat this I thought it might be a good idea to produce two short trailers; one that showed the success of the kite and another that only showed the struggles. For the time being I am going to progress with the first idea as this seems to be option that gives away less plot points, then I shall see if making a second trailer is tangible.

Extended Practices: Reviewing the Animatic

I decided it would be best for me to take Anabeth's advice and look at cutting down my story. The scenes I was considering removing were the ones where the younger sister is flying the kite very close to her/barely off the ground, and the older sister gestures to her to let out more string. Although this was a nice interaction between the two characters, I don't think it is all that necessary that I keep it. The story is still able to show character development through the re-assuring/consoling hug and running away together at the end of the story. This cut would also mean I wouldn't have to lose any of the scenes I have already animated, which is a bonus.

Cut Attempt One

Cut Animatic and Edited Sound

The reason why I was reluctant to cutting out scenes before - besides from the fact that I thought the story was fine as it was - was because I had already made my music collaborators change the score once before. I didn't want to inconvenience them wherever possible, and the idea of reviewing the story was conjured at the same time as receiving my final score. However, I definitely think I made the right decision trimming the story. This amount of work seems much more achievable; I may even be able to finish in time for deadline, depending on how long colouring the remaining scenes takes me!

Once I had removed and re-positioned the scenes in my film, I wanted to make sure that the music would still line up with key elements in the story. I wanted to make sure that the music would get more dramatic as the kite was being successfully flown, and that it would drop in tempo as the kite crashed again. As there was a chunk of around 15 seconds removed from the track, this meant that the music no longer flowed very well, and experimenting with audio transitions in Premiere didn't seem to do the track much justice (Cut Attempt One). As I was hoping for a quick solution, I got in contact with Michael, a student I know from Leeds College of Music. I asked him whether this edit would be possible, and he was happy to help me out. The edited track is seamless and still works well alongside the animation, so I'm really pleased and ready to get back to animating.

Extended Practice: Reviewing The Title Sequence

As I have been trying to save on animating, I thought it was a good idea for me to re-visit my title sequence. The movement that I had planned for the character in the first scene was going to be very time-consuming and challenging, as she was going to have to crouch and turn towards the camera. I feel I've already proved to myself and to the audience that I would be capable of animating this (I have a shot of the character bending over and multiple shots of the characters twisting already animated) and so I don't think it's entirely necessary that I animate this scene, considering I can avoid doing so with a more time-efficient opening.

The idea I had was to simply include a camera pan. It would start at the sky and reveal the title of the film, and then pan down to the characters, where they are stood ready to begin flying the kite.

Title Sequence Idea

Here I have roughed out what I had planned for the title sequence and slotted the clip into my animatic to see how well it works; I prefer this to my original sequence. I think this idea is better at establishing the setting, and I haven't yet used a camera pan in the film. Instead the scenes just cut from one to the other. I think this is a more interesting and dynamic way of introducing the story. 
I also think the change in the scene is better in terms of story line too. Before, you were given insight into the sisters' ability of kite flying (which is likely not very well, as the kite crashes into the leaf pile) from the get-go, where as in this edit the failed attempt comes as more of a shock. 

Extended Practice: Final Crit

I chose to colour the scene where the kite crashes down in front of my character, as its a scene I've received a lot of praise for. I started out by painting a few backgrounds that could be slotted into the scenes, which made me feel better about the progress of my film. The backgrounds didn't take too long to produce, and I realised that some of them could easily be re-used if I scaled them correctly, which means that my film is going to seem to come together quickly once I've slotted these in.


Scanned Backgrounds

When it came to colouring the character, I wanted to experiment briefly with watercolour brushes. The one I had used before in my pre-production test was okay, and it did work well in the beginning, but I realised I wanted to use a brush that would work just as well with the pressure settings turned off. I wanted to make sure that the opacity of the colours was consistent throughout the frames as I didn't want the boiling of the colours to be too distracting/extreme, and I thought this was the best way to do this. I also figured by doing this it would speed up the colouring process as I wouldn't have to focus on achieving a watercolour look; the brush would create the texture for me automatically.


Coloured Scene

The colouring of the scene took a lot longer than I initially anticipated. I think it's going to be a real struggle to get finished on time, so it might be worth exploring whether it would be plausible to cut some scenes out, and/or re-use footage in areas. I think the story is well realised, and there doesn't seem to be any unnecessary scenes, but for submission it might be worth shortening the story in a way that it still makes sense, to enable me to have a finished piece. I can always return to finishing the cut scenes in the weeks before exhibition. 

Final Crit Progress

I didn't really receive much feedback at the crit. I know I'm on the right track, it's just getting it done now. 

So let's do it.

Thursday 4 May 2017

Extended Practice: Promotion Research

As I am looking at making up my own promotion pack for my film, I wanted to look at how other films and shorts had been promoted. I found with The Red Turtle, they had chosen a selection of 'money shots' and used them consistently across their promotional items. For example, the stills they have featured on their website as part of the background are the same stills that have been adapted into movie posters.

Film Posters

MAF Programme and Synopsis

Website Gallery

The Red Turtle - Trailer 

They have kept their synopsis very short and to the point, and have seemed to give you more of an insight into the film with the use of imagery rather than text. This is something I should definitely do, considering my story isn't complex/complicated; it can be easily summed up in one sentence. I also liked that they featured a mix of finished and uncompleted scenes in their gallery, to show the development of the film. 


I researched into how Mr Madila was promoted, as I wanted to see the difference between a short film and feature length. Though I wasn't able to find any posters, I did notice that the stills featured on Rory W.T's website, were consistent across articles and on websites where it has been featured. The trailer is also much shorter - as suspected - but still manages to tease at what the film is about, without giving too much away. 

Extended Practice: Re-evaluating

Recently I've been really struggling with work. Since preparing for the final crit the remaining work load has been put into perspective for me. Had I have not been involved in the car crash which took several weeks out of my schedule, I think I would have been fine, but now I'm really feeling the pressure to get the film finished. Also, consistently working on line work is starting to take its toll on my mental health. Basically I am getting bored/fed up with it and feel I need a change, but I was under the impression that I had to keep pushing through to get the line work finished.

I discussed my issues with Mike, and I came to the conclusion that it would be best for me to make a start at completing a handful of scenes in terms of colour and backgrounds. Not only would this allow my fellow classmates to see the intentions I have for my film in the crit, but I would be able to use the finished scenes in an updated showreel. I am going to pick out a mixture of scenes that I believe to have a strong performance, and scenes that I am going to use in order to make a trailer for my film, and focus on getting those finished. Once I've done that I'm going to push to see how much of the line work I can get done in time for submission.

Extended Practice: Final Music Score

A couple of weeks ago I emailed Nathan about the progress of the music score, as the final crit was approaching and I would have liked to have the music completed by then. I let Nathan know of this deadline and he assured me I would have the final score by then.

Email Conversation

Final Score

Nathan delivered. He sent me a WAV and a MOV file of the score, and I was able to drop it into my Animatic/Premiere file. Though the string quartet isn't live, I don't think it's noticeable and I like the little extra additions the group have added (I'm not sure what to call them, I am clueless when it comes to music). It still lines up with the animation really well so I'm really happy with what they've done.

Sunday 30 April 2017

Extended Practice: Scene 018-023

I've recently finished these scene, and I wanted to briefly talk about it because I think it is one of my favourite scenes up to now. Aside from the jumping at the beginning - which I don't think is as good, as I think it feels a bit too wooden. If I get the chance I'd like to go back and revisit this, and add some head movements and fix the eye-line of the character - I think this is a strong character performance. 

Scene 018-023

I really struggled with the perspective of this scene; not only did I find it hard to draw out the character twisting their body, but she also walked away from the camera, and I found it hard to scale her appropriately. However, I think I've done a good job with this action, and I particularly like the secondary action on the ponytail, as it drags and sways as she jumps, then once again as it whips around as she looks away from the kite.

I also think this scene is well timed. The timing and spacing of the kite allows it to really crash into the ground. I've allowed enough time for the character to react to the kite swooping down in front of her too, which really emphasises the illusion of life.

When it comes to working in colour and backgrounds, I think it would be beneficial for me to start with this scene as I think it could be showreel worthy.

Thursday 27 April 2017

Extended Practice: Progress Screening

Today we had the chance to screen all of our progress to date on the big screen in the Lecture Theatre. It was a great opportunity to see what our final films would look and sound like on a large scale...

Progress 27/04

...and I think it's looking good so far. My animation also got a good reaction out of the audience, which was a massive boost of confidence and motivation. I've been receiving comments on Instagram about my work, but it's so much more rewarding to see reactions first hand.

It's really put into perspective for me how much there is left to be done, and I'm just going to keep plodding on and get as much done as I can in time for Final Crit next week.


Tuesday 18 April 2017

Extended Practice: Progress Review

I've now been animating for 4-5 weeks, and I'm approaching the half way mark with my linework. Had I have not had a week off to go to Lille, I think I would have hit a minute by now, which is really motivating, and I'm so proud that I've made it this far. If I work at the same pace at which I have been doing, I should be able to get finished in time for my deadline. I think it's going to be a bit of a struggle, but I'm finding myself working quicker than what I was at the start of the project, so I'm going to continue to push myself to work. Though on the chance that I don't finish in time, I'm still going to work to get it finished beyond the deadline, as it's a project I want to see through to the end, and I would love for it to be a finished piece in time for final exhibition. The three weeks after the final deadline before exhibition starts would give me plenty of time to finish my film, though the goal is definitely the 18th of May. I'm just going to take each day as it comes, and see how it goes.

Progress So Far

This is the section of my Live Action Video/Animatic that contains all the animated scenes I have to date. I'm really pleased with how it is looking so far. I like that the characters stay consistent throughout and that the clips flow together nicely. I've been posting all of my progress to my Instagram and other social media sites too, where I have been receiving great feedback and compliments on how smooth the motion is, which is wonderful. However, there are still things I would like to go back and change/take another look at if I have time. For instance, making sure the eye line of the characters are correct and that they seem as though they're looking at the object/person they're suppose to be, and making sure to really push the performance of the characters. The scene where I am walking over to the bench is a good example of where this could be reworked. If I make the character droop their head more, and have them looking at the ground rather than the bench ahead, this would really drive the emotion of feeling fed-up. 

A scene I particularly like is when Maressa's character drops the kite spool. I love the innocence of this scene, and I think that the timings on the spool make the drop/bounce seem believable. I am still to add in the kite string but I shall come back to this once the rest of the linework has been completed. 

I also really like the scene at 0:22-0:25. In my opinion the actions are really smooth, and I've made Maressa's character look at me and back to the kite to try and drive performance, and I'd say I have managed to get the eye line right here too. The subtle lean forward of Maressa's character has really made it clear that she's looking at my character. Not only this, it makes the action seem less wooden than what a simple turn of the head might have felt like. I'm making sure to pay attention to little details such as this (and for example, secondary actions on the hair and the weight of the kite string as it falls) to make it feel as lifelike/believable as possible. 

Wednesday 12 April 2017

Extended Practice: Weather the Storm

I wanted to take another look at 'Weather the Storm' directed by Peter Baynton. I first saw it at Manchester Animation Festival, and I loved it for its touching story and how the warmth of the colours and backgrounds complimented this. 

Weather the Storm - Peter Baynton

This short has an aesthetic that I'm striving for with my own work. The backgrounds in the film have been produced using watercolours, and I especially like how they've considered light throughout. For instance, in the first scene where the old man is in bed, you get the impression of the morning light coming through the windows/curtains, as he is laid in shadows. This is something I really want to focus with my own work, not only because it is something I've not really done before, but I also think it would really enhance the visual look of the film. As the animation is set outside, natural light is going to be a huge factor for me. The shadows that this creates will also help the animation feel less flat, which is something I am worried about as the backgrounds aren't going to be layered. Instead they are going to be scanned watercolour images. I certainly think this is something that Weather the Storm has got right in that respect, so I really need to focus on my shading.

I also like the way that the main character has been coloured. He's been coloured digitally, but with a lightly textured brush, making him fit seamlessly with the textured backgrounds. Again, something I strive for with my own work. 

Sunday 9 April 2017

Extended Practice: Getting Back on it.

Due to my recent trip to Lille, I have fallen behind on the production of my animation as I've been focusing on PPP and networking for a week. Now that a large chunk of that is out of the way, I'm going to be able to do nothing but Extended for the next handful of weeks (and it really is just a handful, oh my). I'm still feeling optimistic though, so let's just get to it.

Before I went away, I was able to catch up with my blogging (pretty much). I definitely don't want to fall behind with this again, as it was so much harder to write about hazy production memories. In order to keep on top of this, I'm going to write a weekly update post, or if there is something that I feel is really important I'm going to blog about it at the time of production. Not only will this mean that I keep on track of work, the weekly progress post will allow me to see clearly how much work I've done and what needs to be done in order to finish on time. 

Extended Practice: The Red Turtle

I attended a Masterclass with Michael Dudok de Wit whilst in Lille for the Fete de l'anim, and it was really interesting. He spoke in great depth about his movie The Red Turtle, and it was nice to hear about the production of the film. Though I haven't had the chance to watch it just yet, I have heard a lot about the film as it was also screened at MAF. If I could get the chance to see it I definitely will, as it looks beautiful. It will also be massively useful for me, as a lot of the backgrounds (if not all of them - I'm not sure) are made using watercolours, which is what I am using for my final film. It was interesting to see how they had layered up multiple watercolour paintings to achieve the final look for the background. It's not something I hadn't considered before but is definitely something I should look into if I have the time, as I think it the technique helped to give depth to the environment.

Example of the Build-up in Watercolour/Layers

Thursday 23 March 2017

Extended Practice: Meeting With My Music Collaborators 15/03

The meeting with Nathan went well. I explained to him why I was having to make changes and that I was sorry if this was going to be an inconvenience, but because the edit was only minor and that they hadn't yet started on recording the final pass, that it wasn't going to be an issue. I left him with an updated version of my LAV, and assured him that there would be no more changes to the timings of the animation, however it might be a possibility that the credits at the end of the animation will last longer than what is outlined in the animatic. Again, he assured me that this wouldn't be an issue either, as it would simply be a case of repeating bars of music (I think that's the term he used, I've not a clue when it comes to music).

They are now going to get started on finishing off the music, and I told them that I would keep them posted with progress, and they are going to do the same.

Extended Practice: Updating my LAV

Whenever I have finished animating a scene, I have been slotting my progress into my 'Live Action Video' Premiere project. I thought this was just good practice, and it allows me to see how much has been completed, what there is left to do, and how well the animated sequences flow.

I realised watching through the video that I wanted the kite to crash down next to/near my character, rather than get hit by the kite. This meant that the shot where my character rubs her arm is no longer necessary, and I decided to cut this out. Though it was only a few seconds, this was going to effect the timings of the music that Nathan had sent to me. I let him know of my intentions and thought it was best to meet up to explain the changes I was wanting to make, and whether this was going to be a problem.

I hope not.

Extended Practice: First Music Pass

Nathan sent me a first pass of the soundtrack, and I'm really pleased with it. Just listening to it I was unsure whether it was going to work with the animation, so I slotted the track into my Premiere file, alongside my LAV, and I was really happy with what they'd come up with. I loved the change in tempo as my character sighs; the timings were spot on, and the music accurately portrays the characters emotion.


LAV with Music

I made sure to let the group know that I thought they'd done really well, but that for the final pass I would prefer actual instruments rather than samples. I also mentioned that I thought the music that played in the end credits should be softer, and they have suggested having just the piano play, which I thought was a good idea.

Extended Practice: Beginning to Animate

The time had finally arrived for me to begin animating. It had been so long since I animated something of this nature, that I was actually quite scared. But determined and enthusiastic nonetheless.

Rather than animating all my line work in one big Photoshop file (which would be ridiculous), I 
decided to animate each scene individually. I defined each 'scene' by how long the reference video lasted, and made a separate folder and Photoshop file for each scene in order to keep organised; labeling each file/folder with the time-stamp/duration that was outlined in the Live Action Video. 

Example of File Structure
 
I opted to start with a fairly straightforward scene to ease into the swing of animating again. Despite being a scene with minimal movement, I still tried to bare in mind what I had learnt during CoP, and focus on the little elements that can help give character life and enhance performance. For instance, I made sure to have the pigtails sway as Maressa's character tilted her head, and the subtle shoulder raise of my character as she sighs, to help drive that she is fed-up. 

Scene 047-049

Though it's only a couple of seconds long, I'm pleased that I've made a start with production. It's now just a case of continuing to work.

Extended Practice: Creating a Live Action Video

As I was going to need a lot of reference material to animate my film, I thought it would be best to record a Live Action Video. For authenticity, I got my sisters together to help me film the footage, and recorded each scene from my animatic a number of times, so I could be more selective with which takes worked the best.

Kites: Live Action Video

I thought the LAV was a good idea, not just for reference, but it gave me a better understanding of the timing of the animation. In order to make the video, I slotted in the selected/edited scenes into my animatic, and I found that the LAV and the animatic were similar in length, meaning that I had been accurate in the timings of my animatic to begin with.

The LAV - despite the acting being absolutely terrible in every way, which was made well aware to me in our 'presenting animatics' critique - was a big help to me. It allowed me to feel more confident with the shot framing and the story of the film, as it was a better indicator of how the scenes flowed and how the characters moved. I shall be referring back to this intently rather than my animatic, as I shall study the movements when it comes to animating, and these are also my preferred timings.

I have since been in contact with my music group to inform them about the LAV, and told them that they should work with these timings when producing any demos/music.

Monday 27 February 2017

Extended Practice: Experimenting With Character Colour

I had never drawn the characters for myself, so I took the opportunity to practice drawing the characters in Photoshop. Here I was able to experiment with line quality, as well as potential watercolour brushes/colours for the characters. 

Photoshop Character Progress

I placed the coloured characters on top of a watercolour background I had previously produced, to see if I thought they worked well in the space. I like that even though the linework in the background is fineliner, the digital line of the characters fits seamlessly. I also like that the colour has a similar effect; the style is consistent due to the type of brush used, but the colours aren't as washed out as the background, yet not as harsh/bold as the regular brushes in Photoshop I am used to using. 

Characters In The Environment Test

I also practiced drawing the characters on paper, and I coloured them with watercolour paints to compare the different results. I'm drawn more towards the digital colouring of the characters as I like the contrast between them and the background.


Watercolour Characters

Now I have a greater understanding of how the film is going to look, which I am happy with. This means that I'll be able to progress with animation tests. I first want to try looking at layering up background components in After Effects to try and give the background more depth, so I shall have to produce larger watercolour pieces, so I can also explore using the camera tool.

Thursday 9 February 2017

Extended Practice: Kites - Pre-Production Art Book

Extended Practice: Meeting With My Music Collaborators 08/02

Since my first visit to LCoM, I have decided who I would like to collaborate with; Nathan McGill, Sam Davies and Jinny Finkill. They seemed to be really enthusiastic about the project, and had some good ideas about what the score could sound like.

I had arranged to meet up with them so we could discuss my development with the project and story. I made sure to print out the storyboard I had prepared previously (which I let them keep so they could make notes on it/refer to it when working with the music) and I took my animatic on a USB (again, I have left them with a copy). 

I explained to them that the length of the animation is going to be about 2 minutes 10 seconds, and that it won't change much more than that (the end credits maybe longer than what is outlined in the animatic, as I only put a guide in for the time being). I also outlined what I was expecting of the music, and that I thought the music could get more dramatic as the kite gets further into the air. However, I don't really know much about music or sound design, so all I could say was that the tone of the animation is going to be very light-hearted and that it is going to be set during autumn, and that I wanted the music to reflect this. I pointed out that there would be no dialogue, but was hoping to work in some foley sounds. 

They had some good ideas, and we discussed the possibility of different instruments/rhythms to be played to differentiate between who is flying the kite. On paper, I really liked the sound of the ideas they put forward, but I won't know for certain until I hear how it sounds. They are going to get to work soon and keep me posted with any progress or samples, and I said I'd do the same from my end. We also discussed meeting up again once we had some more solid work, which I am very much looking forward to.

Extended Practice: Producing a Storyboard and Animatic

I took the thumbnails I had produced on sticky notes, and worked with them on Photoshop to make my storyboard more presentable/professional, making sure to make the appropriate changes to the story that had been suggested to me in my critique.


Original Sticky Note Panels and Their Changes

I was happy with the changes I had made to the storyboard, especially the middle panel. The close up of the character laughing broke up a series of mid-shots of the character. Not only that but now that it has been pointed out to me, I see that it is a more appropriate shot to show the emotion of the character. 

Once I had finished drawing up the individual panels, I made up a template storyboard layout to neatly organise my story.


Final Storyboard Panels

I took the panels and edited them together in Premiere to make a rough animatic. As I was working out the timings for each action/scene, I timed myself acting out actions/expressions so that I would have a more informed and accurately timed animatic. Watching it back, some of the scenes seem to last too long as the storyboard panel just holds, but this is down to nothing moving on screen, when in the actual animation there would be character movement. So I get a better idea of timings, I may take this into After Effects to incorporate some basic movement.

First Animatic Draft

Even though the storyboard panels were 1280x720, I still made the video file 1920x1080 so that I would be able to slot in completed animation scenes.